
How to Dual Boot Windows 10 and Tiny 11: A Complete Guide
If you’re looking for a powerful way to run both Windows 10 and Tiny 11 on your PC, you’re in the right place. In this guide, we’ll walk you through how to dual boot Windows 10 and Tiny 11 with a step-by-step approach. Dual booting allows you to switch between operating systems, providing flexibility and optimizing system performance for various tasks. Follow this guide carefully to successfully dual boot Windows 10 and Tiny 11 and make the most of both OS environments.
What Is Dual Booting?
Before we dive into the details, let’s clarify what dual booting means. Dual booting is the process of installing two operating systems on a single computer. When you start your PC, you’ll have the option to choose which OS to load. This method is useful if you want to enjoy the features of different operating systems, like Windows 10 for general productivity and Tiny 11 for a lightweight, efficient alternative.
In this guide, we’ll show you how to set up Windows 10 and Tiny 11 on your machine, step by step, without causing conflicts.
Prerequisites for Dual Booting Windows 10 and Tiny 11
To dual boot Windows 10 and Tiny 11, you’ll need the following:
- A computer with a 64-bit processor.
- A minimum of 8GB of RAM.
- A clean or unused partition for Tiny 11 installation.
- A USB drive (8GB or more) to create a bootable media for Tiny 11.
- Backup all important data before proceeding, as partitioning can cause data loss.
Steps to Dual Boot Windows 10 and Tiny 11
Step 1: Prepare Your Computer
The first step in dual booting Windows 10 and Tiny 11 is to prepare your computer. Ensure that Windows 10 is installed and running properly. You’ll also need to shrink your existing partition to make room for Tiny 11. To do this:
- Open Disk Management on Windows 10 by pressing Win + X and selecting Disk Management.
- Find the partition where Windows 10 is installed (usually C:).
- Right-click on the partition and select Shrink Volume.
- Choose how much space you want to allocate for Tiny 11 (at least 10GB recommended).
- Click Shrink.
This will create unallocated space for the new installation.
Step 2: Create a Bootable USB for Tiny 11
To install Tiny 11, you’ll need to create a bootable USB drive. Here’s how:
- Download the Tiny 11 ISO file from an official or trusted source.
- Download and install Rufus, a tool for creating bootable USB drives.
- Plug in your USB drive (make sure it’s 8GB or larger).
- Open Rufus, select the USB drive, and choose the Tiny 11 ISO.
- Click Start and wait for Rufus to create the bootable USB.
Once this is done, you’re ready to install Tiny 11.
Step 3: Install Tiny 11 on Your Computer
Now that you have your bootable USB ready, it’s time to install Tiny 11. Follow these steps:
- Restart your PC and boot from the USB drive. You may need to press a specific key (like F12, ESC, or DEL) to access the boot menu.
- Select the Tiny 11 USB drive from the boot menu.
- Follow the on-screen instructions to install Tiny 11. During the installation, choose the unallocated space you created earlier.
- Choose to install Tiny 11 on the unallocated space and proceed with the installation.
- Once the installation is complete, the system will restart.
Step 4: Configure the Dual Boot Menu
After installing Tiny 11, you need to configure the dual boot menu so you can choose between Windows 10 and Tiny 11 when you start your PC.
- When your computer restarts, you’ll be presented with a boot menu that lets you select Windows 10 or Tiny 11.
- If you don’t see this menu, you may need to use a tool like EasyBCD to configure the boot loader manually.
- Open EasyBCD on Windows 10 and select Add New Entry.
- Choose Windows and then select the partition where Tiny 11 is installed.
- Save the changes and restart your PC.
Now, you can choose either Windows 10 or Tiny 11 each time your PC boots.
Step 5: Enjoy Dual Booting
With everything set up, your PC is now ready for dual booting. You can switch between Windows 10 for your regular tasks and Tiny 11 for a more lightweight, streamlined experience. This setup will give you the best of both worlds.
Troubleshooting Dual Boot Issues
While the process is straightforward, you might run into a few issues when dual booting Windows 10 and Tiny 11. Here are some common problems and their solutions:
- Boot Menu Not Showing: If the boot menu doesn’t appear, you may need to adjust your BIOS/UEFI settings or use EasyBCD to fix the bootloader.
- Tiny 11 Not Booting: If Tiny 11 fails to boot, ensure that the partition is properly configured and that the installation was successful.
- Storage Conflicts: If you run into storage issues, try using a partition manager to resize or reallocate space between Windows 10 and Tiny 11.
Advantages of Dual Booting Windows 10 and Tiny 11
- Resource Optimization: With Tiny 11, you get a lightweight OS that consumes fewer system resources compared to Windows 10, perfect for older or low-end hardware.
- Flexibility: Dual booting allows you to have the versatility of both operating systems, letting you pick the best one for the task at hand.
- Cost-Efficient: Running Tiny 11 on your system allows you to optimize its performance without upgrading your hardware.
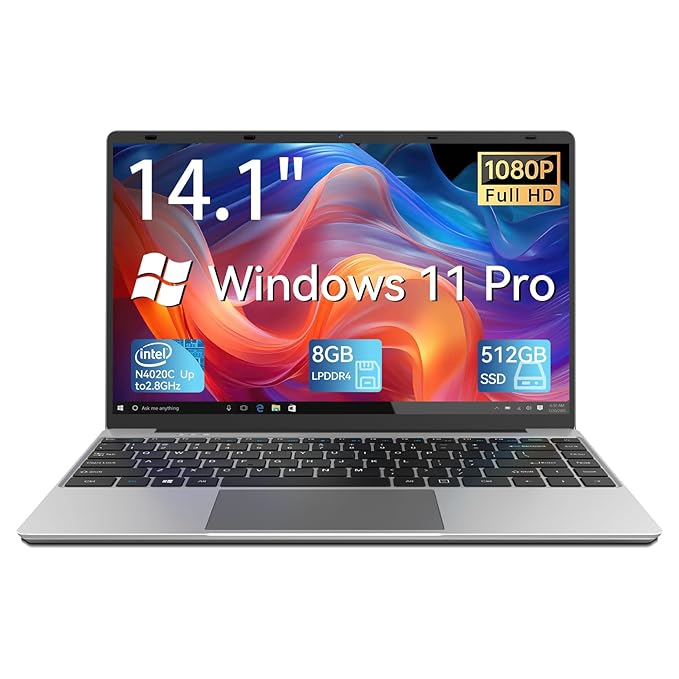
FOLINHAM 14.1 Inch Laptop PC, 8GB RAM 512GB SSD Windows 11 Pro Notebook Computer
About this item
- 💻Lightweight and Portable: Measuring 12.8×8.26×0.74 inches, the 14.1-inch laptop computer weighs only 2.86 lbs / 1.3 kg, making it perfect for travel and on-the-go work or study.
- 💻STORAGE and MEMORY:The FOLINHAM notebook computer, with Windows 11 Pro, 8GB LPDDR4 RAM, and a speedy 512GB SSD, effortlessly handles multitasking. Plus, its TF card slot supports up to 128GB for added storage convenience.
- 💻Lmmersive Visual Experience: This 14.1-inch laptop 8GB ram features an innovative narrow bezel display, a 14.1-inch anti-glare IPS screen with a resolution of 1920*1080, delivering a stunning visual experience. Paired with a 2MP front camera, you can engage in clear face-to-face communication with family and friends via Zoom, Skype, and more.
- 💻Silent Operation: Long-lasting Battery: This fanless computer laptop guarantees a serene workspace. Featuring a 38000mWh battery, it delivers up to 8 hours of cordless computing. (Battery life may vary based on usage frequency).
- 💻Seamless Connectivity, Thoughtful Assurance: The FOLINHAM Windows laptop with webcam offers versatile port support including USB Type-C, USB Type-A, HDMI, Wi-Fi 2.4G/5G, and Bluetooth 4.2, ensuring effortless connectivity to various devices. With a 180° foldable design, it comes with lifetime technical support and a 12-month quality guarantee.
FAQ
Yes, you can dual boot Windows 10 and Tiny 11 on a laptop, provided it meets the minimum system requirements for both operating systems.
No, dual booting should not affect the performance of Windows 10 as long as the installation is done properly and each operating system is installed on a separate partition.
When your PC boots, you’ll be presented with a boot menu where you can choose either Windows 10 or Tiny 11 to load.
Yes, you can install Tiny 11 on a system that already has Windows 10 installed, as long as you create a separate partition for Tiny 11.
If the dual boot menu doesn’t appear, use EasyBCD to manually add an entry for Tiny 11 to the boot menu.