
Introduction
Creating a USB bootable Windows drive from a MacBook is a process that might seem complicated at first, but with the right tools and instructions, it becomes a seamless task. Whether you’re looking to install Windows on a virtual machine, bootcamp, or just need to run Windows on your MacBook, having a bootable USB drive is essential. This guide will walk you through the steps to create a USB bootable Windows drive from MacBook with ease.
Step-by-Step Guide: How to Create a USB Bootable Windows Drive from MacBook
1. Prepare Your MacBook and USB Drive
Before starting, ensure you have a USB drive that has at least 8GB of free space. A larger capacity is recommended for a smoother process. Additionally, make sure your MacBook is running the latest version of macOS and is connected to the internet.
2. Download the Windows ISO File
The first step in how to create a USB bootable Windows drive from MacBook is downloading the Windows ISO file. Visit the official Microsoft website and download the Windows version you want to install. Once downloaded, make sure to keep the file in an accessible location on your MacBook.
3. Format the USB Drive
The next step is to format your USB drive to the proper format. Follow these instructions:
- Insert the USB drive into your MacBook.
- Open Disk Utility (found in Applications > Utilities).
- Select the USB drive from the sidebar.
- Click Erase and choose the ExFAT format for compatibility.
- Name the USB drive (e.g., “Windows Bootable Drive”).
- Click Erase to format the drive.
4. Use Terminal to Create a Bootable Windows Drive
Now comes the part where you’ll use the Terminal app on your MacBook to create a USB bootable Windows drive. Here’s how:
- Open Terminal (found in Applications > Utilities).
- Use the diskutil list command to identify the name of your USB drive (e.g., /dev/disk2).
Run the following command to create the bootable drive:
sudo dd if=/path/to/your/windows.iso of=/dev/disk2 bs=1m
- Replace /path/to/your/windows.iso with the actual path of your Windows ISO file, and /dev/disk2 with the correct disk name for your USB drive.
- Press Enter, and the process will begin. Wait for the Terminal to finish the task. This can take some time, so be patient.
5. Check the Bootable USB Drive
Once the process is completed, you’ll need to verify that the USB drive is bootable. Restart your MacBook and hold down the Option key (⌥) while the system is rebooting. This will bring up the boot manager, where you should see the Windows USB drive as a bootable option.
6. Install Windows
Once you’ve successfully created a USB bootable Windows drive from MacBook, you can proceed with the installation of Windows. Simply follow the on-screen prompts to install Windows on your MacBook, whether you are using Boot Camp or setting up a new system partition.
Troubleshooting Tips
Sometimes, creating a USB bootable Windows drive from MacBook might encounter errors. Here are a few troubleshooting tips:
- Check USB Drive Format: If the USB drive is not being recognized as bootable, ensure it’s formatted correctly in ExFAT.
- ISO File Corruption: Double-check the integrity of your Windows ISO file. If the file is corrupted, download it again from the official Microsoft website.
- Rebooting Issues: If you cannot boot from the USB drive, check that you’ve selected the correct boot option by holding the Option key (⌥) during restart.
Why Create a USB Bootable Windows Drive from MacBook?
There are several reasons why you might want to create a USB bootable Windows drive from MacBook:
- Dual Boot Setup: This method allows you to run both macOS and Windows on the same device using Boot Camp.
- Testing Windows OS: If you’re testing Windows applications or want to troubleshoot Windows, having a bootable USB drive can make the process more efficient.
- Installing Windows on Other Devices: You can use the bootable USB drive to install Windows on other PCs without needing a DVD or an internet connection.
Lenovo Legion 5 Intel Core i7-14650HX 16
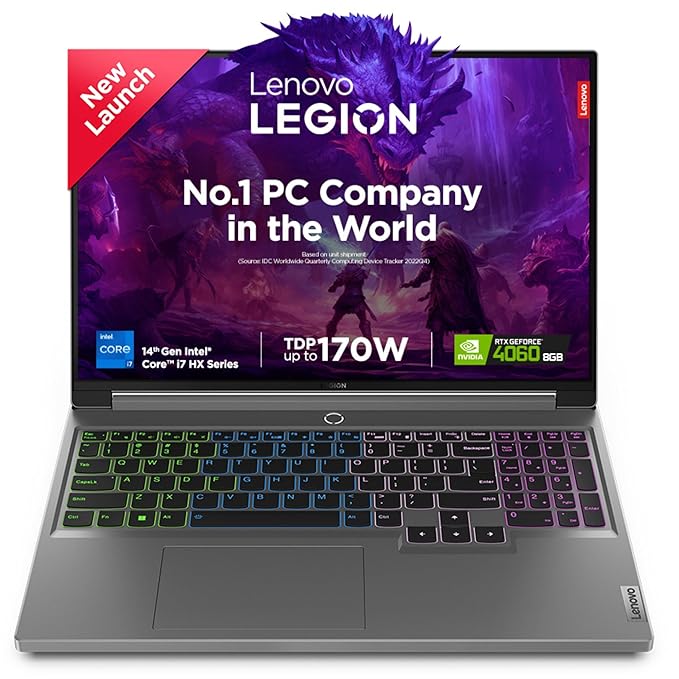
About this item
- Processor:Intel Core i7-14650HX | Speed: 2.2GHz (Base) – 5.2GHz (Max) | 16 Cores | 24 Threads | 30MB Cache
- Display: 16″ WQXGA (2560×1600) IPS Dolby Vision | 165 Hz Refresh Rate |Brightness: 350Nits Anti-glare | 100pct. sRGB || Connectivity : Wifi 6E 11ax (2×2) | Bluetooth 5.2
- Memory: 16GB RAM DDR5-5600 | Storage: 1TB SSD (Expandable upto 2TB)
- Graphics: NVIDIA GeForce RTX 4060 8GB GDDR6 Dedicated Graphics Boost Clock 2370MHz with max TGP 140W | Free-Sync and G-Sync || Cooling: Legion ColdFront Hyper innovative thermal system features fans spinning both inward, working in tandem to eciently expel hot air from the rear, ensuring uninterrupted gameplay. A dedicated hyperchamber maintains optimal temperatures, delivering 15W more power in Extreme Mode, reducing skin temperature by 2°C, and cutting noise by 2db.
- AI Engine + : Improve FPS and Performance with Auto Detect Mode (Top 16 AAA Titles) and Auto Optimisation Mode | Puresight Gaming display optimises your PC for best performance for gaming or best battery life for work
- OS and Pre-Installed Softare: Pre-Loaded Windows 11 Home with Lifetime Validity | MS Office Home and Student 2021 || Battery Life: 80Wh (upto 5 Hrs) | Rapid Charge Pro (100pct. Battery Life in 1 Hr )
- Audio: 2x 2W HD Stereo Speakers, with Nahimic Audio with Surround Sound, Sound Tracker, Night Mode, Sound Sharing & Content Profiles || Camera: FHD 1080p | E-cam Shutter :Physical kill switch for 100pct. privacy protection | Integrated Dual Array Microphone
- Keyboard: 4-Zone RGB Backlit Legion TrueStrike Keyboard with 100pct. Anti-Ghosting, Swappable Keycaps and Soft-Landing switches | 1.5 mm Key Travel | Large Arrow Keys | Large one piece Track Pad
- Warranty: This genuine Lenovo laptop comes with 1 year onsite manufacturer warranty and 1 Year Legion Ultimate Support
- Ports:- 2x USB-A (USB 5Gbps / USB 3.2 Gen 1) | 1x USB-A (USB 5Gbps / USB 3.2 Gen 1), Always On | 1x USB-C (USB 10Gbps / USB 3.2 Gen 2), with PD 140W and DisplayPort 1.4 | 1x USB-C (USB 10Gbps / USB 3.2 Gen 2), with DisplayPort 1.4 | 1x HDMI 2.1, up to 8K/60Hz | 1x Headphone / microphone combo jack (3.5mm) | 1x Ethernet (RJ-45) | 1x Card reader | 1x Power connector
FAQ
Yes, you can create a bootable USB drive directly using the Terminal without needing Boot Camp. The drive can then be used to install Windows on your MacBook or other devices.
Ensure the drive is correctly formatted as ExFAT and try rebooting your MacBook while holding the Option key. Also, check the drive for errors using Disk Utility.
It’s recommended to use a USB drive with at least 8GB of space. A smaller drive might not have enough room for the Windows installation files.
No, you do not need third-party software. You can use macOS’s built-in tools, such as Terminal and Disk Utility, to create a bootable drive.
Yes, a bootable USB drive created from MacBook can be used on a PC as well, as long as the correct Windows installation files are on it.