
Introduction
The master power window switch in the 2011 QX56 is a critical component that controls the power windows of your vehicle. Over time, it may malfunction due to wear and tear, causing inconvenience and safety issues. This blog provides a step-by-step guide on how to replace the master power window switch in your 2011 QX56, helping you save money and time.
Tools Required
To replace the master power window switch in the 2011 QX56, you’ll need the following tools:
- Flathead screwdriver
- Phillips head screwdriver
- Trim removal tool
- New master power window switch (compatible with 2011 QX56)
- Clean cloth
Step-by-Step Guide
Step 1: Disconnect the Battery
Before starting, disconnect the negative terminal of the car battery to avoid electrical shocks and ensure safety.
Step 2: Remove the Door Panel
- Use the trim removal tool to gently pry off the door panel.
- Unscrew the fasteners holding the panel in place using a Phillips head screwdriver.
- Carefully detach the panel, ensuring you don’t damage any wires.
Step 3: Locate the Master Power Window Switch
The master power window switch in the 2011 QX56 is located on the driver’s side door. Disconnect the electrical connectors attached to the switch.
Step 4: Remove the Old Switch
- Use a flathead screwdriver to release the clips holding the switch in place.
- Gently pull the old switch out of the housing.
Step 5: Install the New Switch
- Insert the new master power window switch for the 2011 QX56 into the housing.
- Ensure it is securely clipped in place.
Step 6: Reconnect Electrical Connectors
Plug the electrical connectors back into the new switch, ensuring they are firmly attached.
Step 7: Reinstall the Door Panel
- Position the door panel back into place and secure it with screws.
- Press the panel firmly to ensure all clips are reattached.
Step 8: Reconnect the Battery and Test
Reconnect the car battery and test the new master power window switch in the 2011 QX56 to ensure all windows function correctly.
Common Mistakes to Avoid
- Not disconnecting the battery, which could lead to electrical issues.
- Forcing the door panel, which can damage clips or wires.
- Using incompatible replacement parts.
ALKETRON Hammer H60 Professional PC - i7core 12th Gen
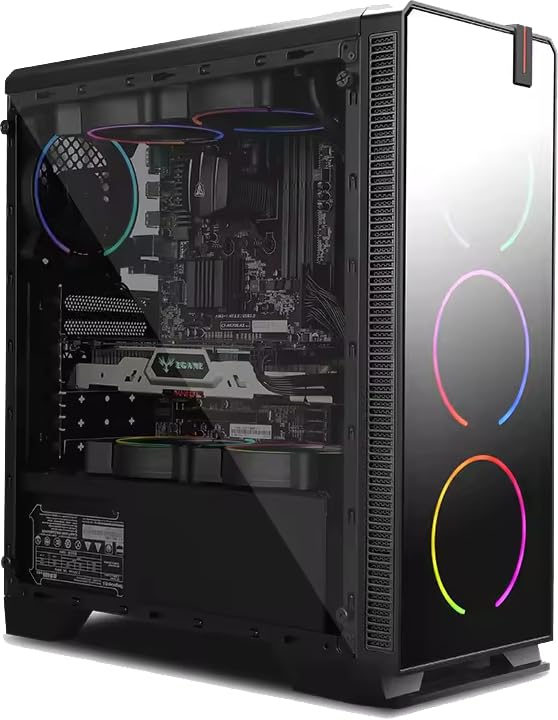
About this item
- Installation Instructions: Please contact ALKETRON computers for product delivery & installation instructions after making the purchase. Sales, services & warranty support available all over India. ALKETRON Computers – an Indian hardware start-up obsessed with Quality Engineering
- Processor specification: i7 core 12th GEN Processor (Alder Lake) i7-12700F | Total Cores 12; Performance-cores-8; Efficient-cores – 4 | Total Threads 20 | Max Turbo Frequency 4.90 GHz
- Technical Specifications:- Graphics Card: NVIDIA RTX 3050 6GB GDDR6 dedicated graphics | Memory: 32GB-DDR4-3200MHz-Gaming Desktop RAM | Primary SSD: High Speed 256GB NVMe SSD | Storage SSD: 1TB 2.5” Gaming SSD with metal casing heat sink | CPU Cooling: ARGB 120MM Liquid Cooling System with aura sync | Cabinet Cooling: 4 x ARGB fans with remote aura controllers | Power Supply: 650 watts 80 Plus Bronze Gaming PSU unit
- Product Highlights: This is a Professional Gaming system with Nvidia RTX 3050 dedicated graphics for Pro Gamers, Content creators & Video editors
- Operating System & Software Installed (Dual OS install): Windows11 Professional with lifetime key provided. Ubuntu with “Steam” game downloader pre-installed. Pre installed MS office with lifetime registration.
- Pre dispatch PC testing: CPU core temps test with vigorous CPU stressing. FPS test with Graphic card stress & temps testing. All drivers testing such as Audio/video, graphics, wifi, bluetooth etc..
- Product Note: Gaming Cabinet with Toughened Glass(6mm) & Solid Aluminium body (Actual Cabinet similar to the images posted). Completely assembled PC, Just Plug N Play to the Monitor or Display of your choice (Monitor not included)
- Warranty details: Factory fitted completely assembled, Ready to use. Door to Door after sales services available all across India by ALKETRON computers. For more details on the product please connect with ALKETRON computers
FAQ
The replacement cost ranges from $50 to $150, depending on the part and whether you DIY or hire a mechanic.
Yes, with basic tools and this guide, you can replace it yourself, saving labor costs.
The process typically takes 30-60 minutes.
Signs include unresponsive windows, intermittent functioning, or windows stuck in one position.
You can find replacements at auto parts stores, online marketplaces, or your vehicle’s dealership.